Pteris
|
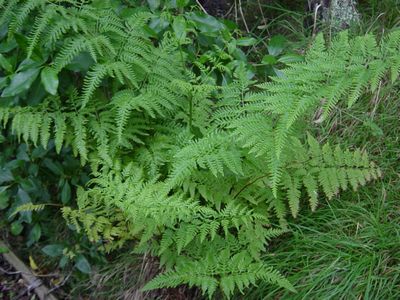
This is a large group of Ferns that can be grown in greenhouses, hothouses, and homes. There are hardy kinds that lose their leaves (deciduous) and kinds that are evergreen. They are found wild in many parts of the world, such as tropical America, tropical Asia, India, China, Japan, West Indies, southern Africa, Australia, New Zealand and Europe. Pteris vary greatly in their sizes and shapes. Some are a few inches tall and some are several feet tall. Most kinds have fronds that are divided deeply into many long, ribbon-like sections. P. cretica, the Cretan Brake, is one of the most popular kinds. Growing up to 18 inches high, this Fern forms masses of light green, evergreen or semi-evergreen foliage. The leaves are broadly oval to triangular and divided into finger-like segments. P. cretica albolineata grows up to 18 inches high and has evergreen or semi-evergreen leaves, up to 8 inches long. These are in forked or linear segments. They are pale green striped down the center with creamy white.
Pot CultivationThose belonging in a hothouse need a minimum temperature of 55 degrees and those belonging in a cool greenhouse need one of 45 degrees. These Ferns can be grown outdoors in mild climates. Ferns that are grown as houseplants need protection from radiators or other sources of dry heat. They need a lot of water but the soil must not become stagnant. These plants should be placed in a shady, cool corner away from drafts. They can be set outside on warm, rainy days to cleanse and freshen the foliage. The best soil to use consists of equal parts of loam, peat, leaf mold and sand. Quick growing kinds, such as P. cretica and P. tremula, grow best in equal parts of loam and leaf mold with a generous supply of sand to make it porous. Repotting of hothouse kinds should be done in February and cool greenhouse kinds in March, or as soon as the fronds begin to develop. They are taken out of their pots and their roots checked. Those that have few roots are put back into their old pots and repotted later and those that have a healthy root system are placed in slightly larger pots. Those that have decaying roots (caused by inadequate drainage) must be repotted in smaller pots after all of the old compost in removed from their roots. When repotting, clean the old crocks and loose soil from their roots and place them in pots that have a layer of crocks in the bottom covered with the rough siftings from the compost. Press the soil firmly with your fingers. Don't give any water until the soil becomes pretty dry, then thoroughly moisten it. Continue watering this way until the plants are well rooted. Too much water will cause the soil to sour and the roots to rot. Keep a humid atmosphere by wetting the benches and floor of the greenhouse; less moisture is needed in the winter. After potting, shade the plants from strong sunlight until fall. Repotting for houseplants is done the same way as those in hot or cool greenhouses. PropagationThese plants can be increased by spores in the summer, or by division in the spring. When dividing, remove the soil from the roots by shaking or washing them. Pull them apart or cut them with a sharp knife. Each section should have a piece of rhizome or crown with roots and a few leaves or buds attached. Plant each piece in a small pot and treat as advised for repotting. If sowing spores is the method you choose, they may be sown as soon as they are ripe, or they can be kept in seed packets to sow at a later date. A way to see if the spores are ripe is to pluck a frond that has dark-brown spores. Place in a paper bag and set in a room that has good ventilation for a few hours. The spores that fall to the bottom of the bag are ripe. Small pots are filled half way with crocks, which in turn are covered with rough siftings from the compost. Fill the rest of the pot with finely sifted compost and moisten it by setting the pot in a pail of water. Scatter the spores thinly on top of the soil. A pinch of spores is plenty enough for a 5-inch pot. After they are sown do not apply any water. Keep the soil moist by setting the pot in a saucer of water and cover it with a pane of glass. As soon as they are big enough to handle, they can be pricked out in little clusters and planted an inch apart in a deep seed pan filled with finely sifted compost. Moisten the soil and lay a pane of glass over them for a few days so they can become established. When they're large enough to be potted separately, do so in 2-inch pots and later on in larger pots.
Varieties
|
Support our developers


